
Lens-flare Shader for Blender Cycles with real time preview
I have been using Blender for several years and have recently started to learn OSL - Open Shader Language.
As a first project I embarked upon creating a lens-flare shader for Blender. In the process I came across a lens-flare shader, written for the Renderman language by Larry Gritz & Tony Apodaca.
I decided to try and port this to OSL - and to my surprise after a day of tinkering it worked! Along the way I added a few features, such as user definable images for lens-flare elements and have got to a point where the shader can now be released. Details about how to download and use this shader are given below - along with video tutorial links.
Before proceeding, a big thanks to the original authors of the shader, Larry Gritz for his work in making the Open Shader Language available to the world and the Blender developers for creating such a great tool.
In the process of learning OSL (an on-going process) I found the following blogs / links extremely helpful.
- Open Shading web site by Thomas Dinges.
A great way to learn how to start with OSL and Blender. - Small Blender Things - a fantastic site for OSL code implemented for Blender.
- The Open Shading Language Specification. An essential tool.
 |
| Screenshot showing the lens- flare shader node set up, real time 3D preview, and positioning control. Drivers are used to link the position control Empty to the shaders "LightPosition" input. |
Lens-flare Shader Features:
- Real time 3D viewport preview.
- Shader output may be connected directly to a Material's "Surface" node connection (easy node setup).
- Lens-flare light source position co-ordinates may be set by the user.
- Highly customisable Bloom, Starburst, Rainbow, Disk, RIng,Blot and Hole elements.
- Number of spots, and the distribution of spot type, may be varied by the user.
- Optional user definable images for all lens-flare elements (new feature).
- Full control to mix between synthesised lens-flare and user image based lens flare.
- Lens flare elements may be drawn in GIMP - Photoshop - Downloaded - or other.
- Easy color tinting.
- Simple random color variation user settings.
- Automatic or user definable aspect ratio setting (e.g. for anamorphic lens-flare).
- An Extensive selection of Color outputs allow all of the lens flare elements to be further proceed in the node editor if desired.
Shader Set up:
 |
| The lens-flare is created by applying the shader to a plane parented in front of the camera. An "Empty" is used to define the position of the flare's light source. |
 |
| The image above shows the simple shader node set up for the lens-flare plane material. The "Light Source Empty" position is fed to the shader using Drivers to set the x,y and z inputs of Value nodes. |
Video Tutorials
Two of the planned four tutorial videos have been completed. Follow the links to see an overview of the lens-flare shader features - anda tutorial on how to set up a scene with this shader.- LensFlare Tutorial Part 1 of 4: Blender Real TIme Lens Flare Shader Introduction.
- LensFlare Tutorial: Part 2 of 4: How To Set Up a LensFlare Shader in Blender.
Download an Example Blend file and LensFlare Shader File (lensflare1v1.osl)
An example .blend file with an:
- Example scene
- lensflare1v1.osl shader
- Sample user defined shader textures
- Masking composite node setup
is available from Blendswap here.
Get a copy of the Shader here!
- Download a copy of the code below as lensflare1v1.osl - and save into the same directory as your .blend file.
- Load the file as a script in the materials node editor - and connect directly to the Material output node of a plane parented to the front of a camera. Follow the video tutorials for more information.
Automated masking of the flare
This is the subject of an upcoming video - however if you want the Node
Noodle - either download the .blend file from Blendswap (see above) or copy the node setting below.
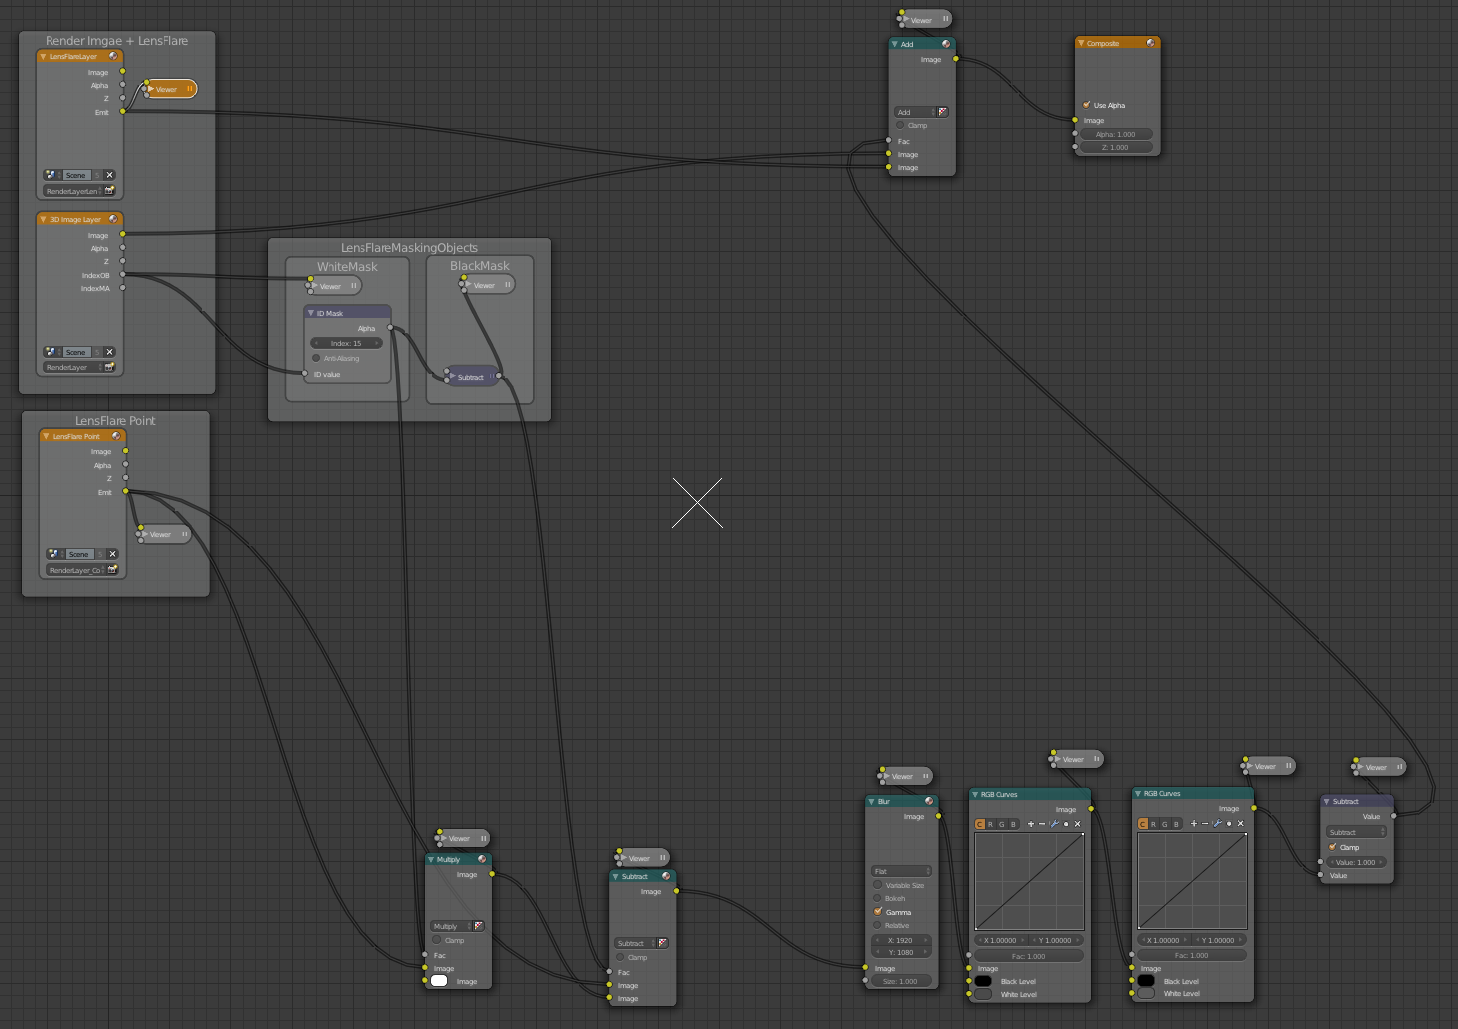
Note: An additional lensflare plane with its own shader is needed in front of the camera for this to work)
Noodle - either download the .blend file from Blendswap (see above) or copy the node setting below.
Note: An additional lensflare plane with its own shader is needed in front of the camera for this to work)
Thanks for sharing great info!
ReplyDeleteThanks! You're welcome :-)
ReplyDeletethanks but what about 2 lens flares do i just make a second plane and source?
ReplyDeleteHi Dan,
ReplyDeleteYes, you can do that, or to add more that one lens flare, just use an "Add Shader" node to add them all up -- as many as you want.
There's a screen shot showing this in Blender Artists (you'' have to log on to see the image).
http://www.blenderartists.org/forum/showthread.php?292861-Lens-flare-Shader-for-Cycles-with-real-time-preview
It's the second post from the bottom of the page (well it at the moment). Look for the space shuttle image.
Thanks for script :)
ReplyDeletePlease, can you check if script works correctly for 2.7 and newer builds?
Instead of hexagon shape I got sharp circles.
Seems like textures are not used by script.
Thanks for help
(I tried to reconnect them too.)
How can I avoid lens flare from head on lights?
ReplyDeletetilt-shift