LensFlare Tutorial Part 3 of 4: Blender Lens Flare: Automatic Masking
I have just posted a new tutorial on how to achieve automated masking of the lens flare using Blenders compositor.
Automated masking of lens flares can be very useful for complex scenes -- such as in a forrest - where many randomly placed branches may block a lens flare.

Here is an introduction animation showing the automated masking in action:
Here is the tutorial.
It's a little long - weighing in at just over 60mins -- but it has been put together to allow a non-expert to create a scene using the lens flare shader from scratch. Links in the info section below the video allow advanced users to skip ahead.
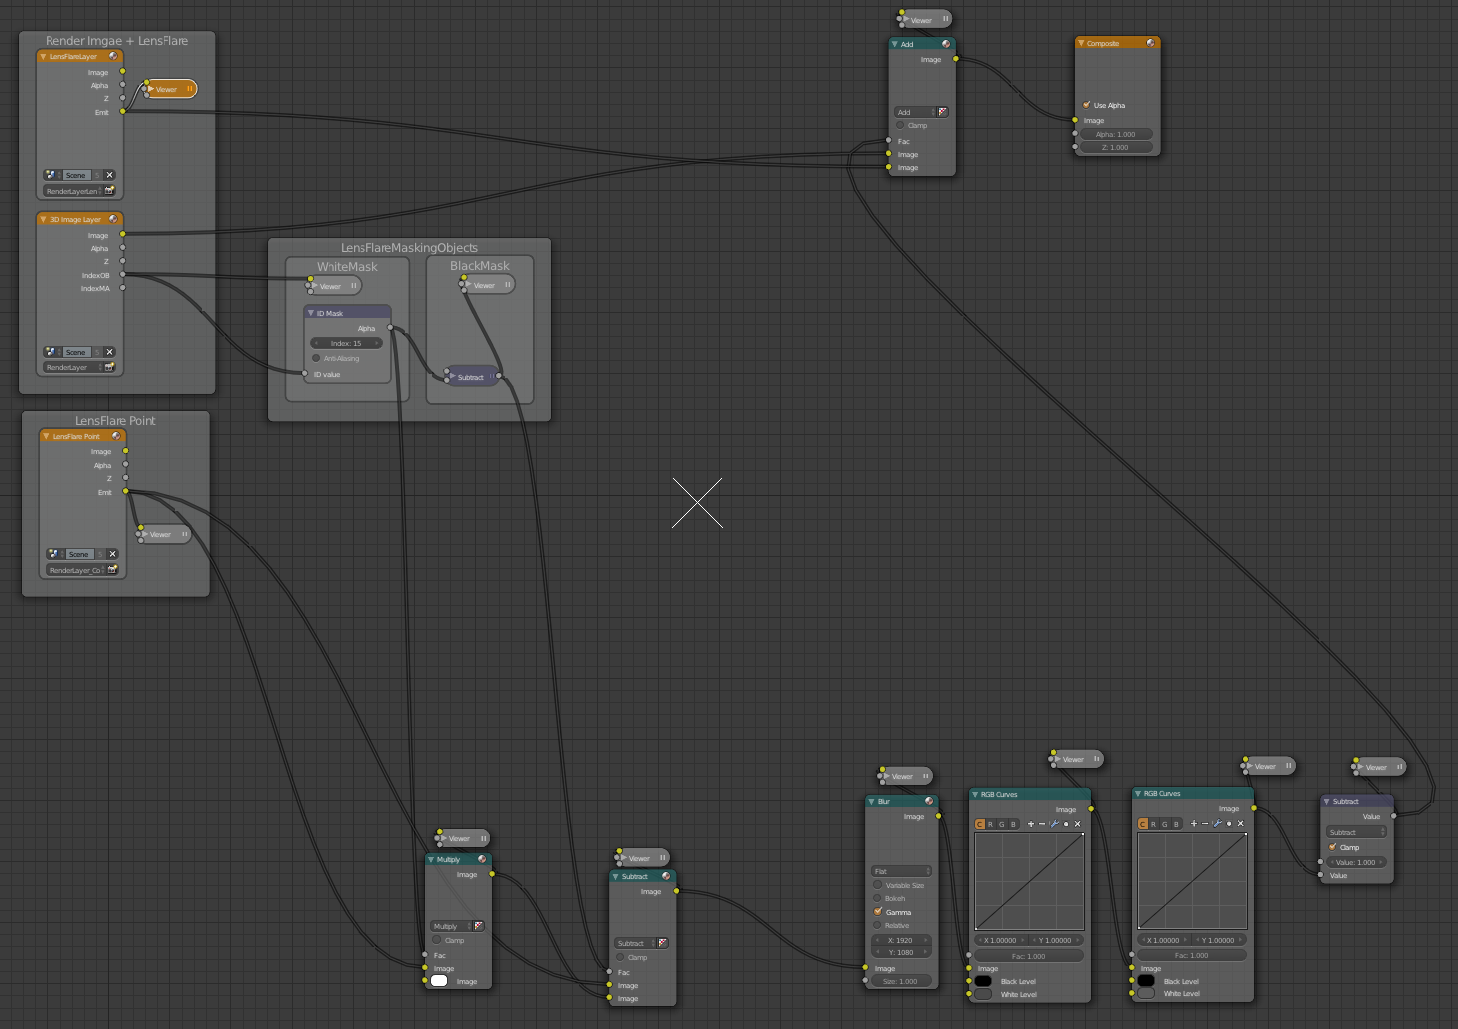
Here's the Automated Masking Node Setup
The actual node set up is reasonably simple - as can be seen from the noodle below.
The general idea works as follows:
- Solid 3D objects in the scene that should block a lens flare are given a Pass Index.
The IndexOB render-pass is enabled in the RenderLayer(s) for these objects. - A small emission source (e.g an icosphere) is placed on it's own RenderLayer.
The emission source is parented to the empty that defines the position of the lens flare bloom. - The emission source output image, from its RenderLayer is Multiplied by the output of an IDMask. The IDMask index is set to match the Pass Index from above.
a) Flare Blocked: When the emission source is behind a 'solid' 3D objects (white) mask -- then its bright white image passes through the Multiply node. (i.e. 1 x 1 = 1 = small white dot)
b) Flare Not Blocked: If he emission source is not behind a white mask -- then it does not appear at the out put of the Multiply node. (i.e. 1 x 0 = 0 = totally black image) - The output of the Multiply node is fed into a Dilate node. This will turn the small white dot from 3a into a fully white image that is the size of the render image.
a) Flare Blocked: Output = fully white image.
b) Flare not Blocked: Output = fully black image.
(In earlier version of this noodle - various blur functions were used to spread the dot 'gating signal' to cover the whole image. - The output of the Dilate node is inverted.
a) Flare Blocked: Output = fully black image.
b) Flare not Blocked: Output = fully white image.
Hence this signal can be fed directly to the Fac input off the ADD color mixer that mixes the output from the lens flare render layer with the output from the general 3D scene render layer.
 |
| Automated Lens Flare Masking Node Setup (click to enlarge) |
The main reason that the video is so long is that it takes a while to go through the steps (for newer users) that allow all the render layers to be setup and the drivers to be added to the shaders.
There are many more way's to achieve this automated masking effect I'm sure - so it will be interesting to see what people come up with.
This latest invocation is fair;y simple -- and very fast. It does appear to be very 'binary' however. It mostly seems to block - or not block.
Some of the earlers methods that used blur nodes etc were very good at quickly 'fading out' the lens flare as it passed behind objects (such as tree branches or plane wings).
Some of the earlers methods that used blur nodes etc were very good at quickly 'fading out' the lens flare as it passed behind objects (such as tree branches or plane wings).
Some tuning can be made with the masking sensitivity however by changing the emission brightness of the source (as seen in the video).
Draw Backs
The compositing method as described above has a key drawback in that once the lens flare bloom moves off the screen (along with its special masking emission source), the compositor can no longer be used to manage the masking -- as it cannot process off screen images.
There are work around for this - such as adding another special emission light source on the 'Masking' Render layer that can be 'keyed' by hand to get the flare into the desired visible state. The lens flare shader's Intensity input itself may also be 'keyed' in this case.
The Future
I would like to investigate the use of the OSL 'trace' function to determine if any 3D scene objects are occluding the ray from the camera to the 'light source'. I did try this when porting/developing the shader - but without initial success. It should be possible though - so hopefilly in the future -- extra compositing nodes and render layers will not be required.
Until then however -- this nifty trick seems to work well.
Also in the future - it would be good to see if a Python add on, or a Pynode, could be used to automate the set up of the lens flare render layers camera plane creation and parenting. Again -- this should be quite do-able - but will have to wait for some development time ;-)